Follow Me on Pinterest
Instead of posting links to Making Do Ideas on this blog now (I'll just post my own projects here though they are few and far between now), I'm now posting them on my Pinterest Board named Making Do Stuff.
You do not have to have a Pinterest account to see it.

Tuesday, March 31, 2009

Paint the Propane Tank

My propane tank with my new house was tangled with vines and rusty. Never had a propane tank before, so I called the company that I rent it from and asked if that was ok if I painted it so it would look nicer and what kind of paint to use to do so.

They not only told me it was ok (White or Silver paint is best), but that if I did it, to give them a call and let them know, they would check to be sure I did it and then they would take off the $60 rental fee for the year. So, left over white flat primer house paint and an hour of sanding off the gunk and an hour of painting equals a free year of propane tank rental.

So, if your propane tank needs painting, call your company and see if they won't do the same for you.

Monday, March 30, 2009

Elephant Hat

My kiddo loves the youtube video of Natalie Portman and Elmo on Sesame Street playing the Princess and the Elephant and wants to play along. The costume for the princess is easy, any number of tiaras and scarves from the play box will suffice, but I needed an elephant hat to play along. So, I had to make one.


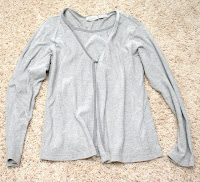
I just went to the thrift store with the free aisle and took several bag fulls of 100% organic material clothing for another project (yes, when I get to it, I will post it). So I had all these free clothes, and one happened to be gray, so it will become my elephant.

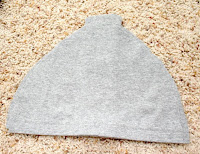
First I traced on two layers of the shirt a hat of 11" x 8" with the hem of the shirt making the band of my hat.


Then I cut a shoulder pad in half to help keep the ears sticking out. If I did it again, I might try to find some kind of metal if I wanted to be a stickler on the ears sticking out, but I would rather be able to wash it. Maybe I would use a whole shoulder pad.

Then I cut 4 layers of ears. I wasn't exact because I wanted them to look floppy.

Then I folded one sleeve in half and cut it just a bit longer than the hat for the trunk. (You can just barely see it poking above the hat.)

Here are all my pieces. (I thought I was going to line the ear end with the velvet, but decided I wasn't seamstress enough to handle it, so ignore those trim pieces!)

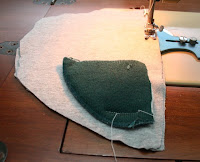
Next, I tacked on the shoulder pad to the wrong side of one piece of the ears.

Then I put the wrong sides out (There are 2 pieces of gray material under the shoulder pad) and sewed the ear all the way around, leaving a hole at the bottom to turn the ear inside out. Then I turned it right side out and tacked my hole closed to make the ear.

So, now I piled the nose and ears on top of the right side of one piece of hat, then I put on the other piece of hat (at the top of the picture) on top of that, sandwiching the pieces in the middle. The hat's wrong sides are facing out. (You can always pin this in and turn it inside out to see if you got it before sewing.)

Then I pinned it. You want to sew the ears edges all the way down with the hat so it will stand out and not flop too much.

Sew this all the way around and turn out. Here is the hat finished:

And on:

I sure hope she wants to be the elephant; I prefer looking like a princess! She sure had fun dancing and "blowing" her trunk.

Friday, March 20, 2009

Melted Butter Greasing

If you have a recipe that asks for melted butter and the greasing of a pan (like my granola bar recipe), don't waste shortening or oil to grease your pan, just smear the excess melted butter clinging to the bowl you melted it in onto the bottom of your pan. Works great and you were just going to wash it down the drain anyway.

Thursday, March 19, 2009

CD Bird Chasers

What to do with those junk mail CDs or scratched up ones beside throw them away?

As a kid, we used to hang pot pie tins from the garden stakes to keep birds away from the garden. I think I will be using CDs instead, much prettier. Does it work all that well? Mmm, not planning to set up a control garden and check out the difference in rates of birds pecking at the separate gardens, but it doesn't cost me anything so why wouldn't I?

Here are some other crafty ideas or these.

Wednesday, March 18, 2009

Homemade Peeps or Homemade Marshmallows

Easter is around the corner, so I had to go check out the candy aisle to look at the Peeps. Not that I planned to buy any until after Easter when I stock up on the 50% off sale, but I am obsessed, had to look. And oh my! Those things have gone up in price and down in volume. They basically shrunk the amount by half and doubled the price. Not that I should be too surprised since that is what is happening to most of my groceries, but these are my one bad splurge a year. So, grumpily, I continued shopping knowing I couldn't possibly justify buying those bad-for-me-things anymore.

Then, I got the idea that I should make them, duh! Took me awhile to find a recipe and not just a comment about how to make them. Actually, I worked off of 3 pieces of info from the net, most saying they used the Martha Stewart's recipe as a base. (Mainly this one)

It's only water, sugar and gelatin. Now I knew I couldn't spend that much on cheap ingredients anymore! There was no turning back.

Here is the recipe:

Ingredients
1/3 cup water
1 package gelatin (2.5 tsp)

1/4 cup water
1 cup sugar
1 T vanilla (1/2 or less T homemade vanilla)

Sugar
Food Coloring

Directions
First take the package of gelatin and let it sit 5+ minutes in the 1/3 cup water til "soft." Whatever that means? It takes plenty enough time for the next step I am sure it was soft when I got to it.

Then while waiting on that to soften. Take the 1/4 cup water and 1 cup sugar and stir on medium high heat until sugar is dissolved. Then wait til syrup gets to boiling and hits 240 degrees with a candy thermometer.


Pour hot syrup into gelatin mixture and Mix on low for awhile to let it cool down some. (5 min)

Then add vanilla. I put in my homemade vanilla it was heavenly, but way too powerful! Next time, I will decrease it by half. Then increase mixer speed to medium high and mix for 10+ minutes until mixture forms soft peaks (peaks droop after being made).

Meanwhile make your sugar. I took a cereal liner, placed it on a baking sheet and sifted powdered sugar (so I wouldn't waste my blue) all over it for the marshmallow to set on. I made blue sugar by stirring in a drop of food coloring into a bowl of sugar. Next time I will just sift on more powdered sugar, but I was going for real Peeps look.

Then as soon as your mixture hits soft peak stage get ready! I tried to pipe a chicken peep with a sandwich bag with a hole in it. Well you can see how that went!

But you have to go fast! I played with my chicken peep too long and the marshmallow was already setting up so I just tried to smear it out, looks like a glop. Then I sprinkled on my blue sugar.


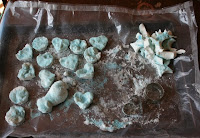
I did take the glop and cut it with cookie cutters. Here are my badly formed Peeps! Next time I will just spread it out and cut it into squares.


They are really good and now I know what non-stale Peeps taste like - highly addictive! (As if I weren't addicted already) Bad thing about this is that I will now have the temptation to gorge myself on these things year round! But thankfully they take a bit of time to make so that might curb making it constantly. But these are great marshmallows, I think I need to get just one more from the container now that I am thinking about it! :)

Tuesday, March 17, 2009

Pringles Cans Bowling Pins

What to do with Pringles Cans? How about indoor bowling?

Take 10 Pringles Cans, wrap in computer paper.

Cut off the excess and use that as a guide to cut off the rest of the 9 pieces of paper.

Use the excess to tape up the back if you want, it will miss covering just a tiny bit of the can.

Use a Red crayon or marker to draw the neck line. Then, set up as a bowling target at the end of the hallway.


And have fun rolling a ball down the alley in attempt to get a strike!

Monday, March 16, 2009

Cheap Thank Yous

With all the baby gifts I received or the birthday gifts my child received, I wanted to send out Thank yous, but fun ones and in post card form to save on postage.

So, I would take a picture of her wearing the outfit or playing with the toy and then open it in printshop software to make a postcard, or I just make the photo about the size of a postcard, write on it with my photo software and print it out on card stock. I cut it out and address the other side like a letter. I think it is much more fun to send a thank you note to the person with a photo of your child playing with the item. And because I hate being serious, I write something silly on the cards, when my kid gets old enough, I will have her write the actual thank you.

Example:

Friday, March 13, 2009

Reader Suggestion Friday: Cheap Birth Announcements and Christmas Cards

My Follower, Dani', recently had a baby (Congratulations!) and wanted to find a cheap alternative for baby announcements. For my own baby announcements 2.5 yrs ago, I made my own card on the computer and included a 4x6 photo hand cut to fit in the envelope - I got 50 free 4x6 photos from shutterfly I believe - and slipped it in the card. I don't have my cost breakdown from way back then, but Dani' looked at Shutterfly and looked around for a cheaper alternative. She found a Vistaprint sale.

I had not heard of Vistaprint, but these kind of online photo product people have some pretty fierce competition. I know of many: Shutterfly, Snapfish, Winkflash, Walmart and MPix (MPix caters to professional photographers so they are not as cheap as the others, but if you want quality on an important photo, I included this in my list; I got a big 14x16 from them once.) I am sure there are others. Besides MPix, these companies often run lots of sales, certain # free, % off, etc. Sign up on their email lists and monthly you'll get sale flyers in your inbox from them.

When I chose to physically scrapbook my child's first year, I collected all the different offers from the groups and took advantage of them. I used winkflash, snapfish, walmart and shutterfly to get as many as I could for as little as possible. Just for grins, I bought one of the same photo from each place to compare them. None of them looked bad separately, but from the line up, I remember winkflash's colors were pretty bad, so I took myself off their list although they had some of the cheapest prices (guess that's why). The other three were comparable, there were color differences, but I couldn't decided if any were better or truer than another.

The Christmas before last, I used the postcard feature of one of these companies to make Christmas announcements and like Dani' created my own background. Well actually, what I did was chose the layout of one picture next to the wording and in Photoshop Elements created the the "picture" by laying out several photos. I made my own layout because I didn't like any of the options for my photos. Here's my 4x6 "photo" that I made in Photoshop to put in the photo slot next to the wording and the finished card.


I'll let Dani' explain her own process. I liked how she calculated every part. That is smart shopping.

"My friend had a baby about a month before I had mine. She sent out these cute birth announcements from shutterfly.com, which I thought was a great idea. I went to the website to check out prices, and found the cheapest was $.55 per card, but only if you ordered 255 or more. We have a big family, but not that big. In smaller quantities, the cards cost even more. For 50 birth announcements, it would cost $39.50 ($.79 per card) plus $6.99 for shipping, for a total of $46.49. This adjusts to approximately $.93 each. Add a stamp for each one, and you're well over a dollar for each card.

Then I got an e-mail from Vistaprint.com, which I have used to advertise my Etsy shop. They were having one of their mega sales, which they have just about every week, and I saw that I could get 50 free jumbo postcards. You can use one of their pre-designed layouts, which don't work for baby announcements since they're all for advertising. However, there is an option to upload your own design for $2.49.

After some wrangling with Paint Shop Pro (you could use Photoshop, Paint, or any other graphics program, I even made a decent one in Word 2007), I came up with a nice design (it has to be 8.5 inches by 5.57 inches and at least 300 DPI resolution) and uploaded it to Vistaprint. When I checked out, I selected the slowest processing and shipping option possible, which says it takes 21 days. That cost $6.37, for an order total of $8.86, a savings of $37.63 over shutterfly. Each card essentially cost 18 cents.

As for the "slow" speed, I placed my order on Feb 24th and it shipped on Feb 26th. I received them in the mail on the 28th.

I also liked that I got to make my own design, rather than settle for the limited selection of cutesy baby designs at shutterfly. For someone who is handy with a graphics program, these will work for Christmas cards, party invitations, you name it. Just be sure to read everything. Vistaprint makes its money off of shipping, additional options (like uploading your design or adding a color backside to the postcards), and offering you "matching" products at every step. Just turn down all special offers and you've got a frugal way to announce the big things in your life!"

Here's her card:


BTW - she has a blog post on how she downsized her own jeans to fit her toddler boy. Very cute with skull applique.

Thursday, March 12, 2009

Laundry Hot Water - Cleaning Power vs. Energy Efficiency

Should you or should you not use hot water in your washing machine? That is the question.

There are many facets to this question.
1) How will this affect my energy consumption?
2) How can I best disinfect my laundry?
3) How can I get my laundry to come out clean?
4) How will this affect my washing machine?

1) Energy Consumption - Obviously, hot water is added energy cost. You gotta heat up the water, but how much does it cost? This wonderfully thorough site gives an in-depth breakdown of electricity uses by the temperature of the water you use in your type of washing machine. According to this site, if I have the typical electricity costs, I save 55 cents every time I choose to do cold/cold instead of hot/warm or $215 over the course of the year. Also, see that same site for a discussion of electricity costs of a front loader vs. a top loader.

So, Cold water is cheaper; yeah for cold water.

2) Disinfecting - If you are relying on hot water to kill the bacteria and other harmful buggies in your clothing, think again. Yes, hot water or hot temperatures will kill off bacteria, people even, but not the hot water that comes from your water heater, it's not hot enough. You need it to be boiling before it would reach any kind of efficacy at killing bacteria in your laundry. It might get some of them, but not the majority of them. You have two options, bleach or the sun. Yeah for the sun! Free disinfectant in your backyard, my fellow clothesline hangers. Both, however, can harm clothing. I think everyone knows what a bleach spill will do to your clothing, but the sun if given too much time will do damage too, think of the item you left in the car's back seat window. This site gives you the scientific reasoning for how the sun is a disinfectant and why it is a better option than bleach. So a hot water washing cycle does not kill off all those scary things you are worried about floating in your fibers.

Yeah for cold water, does maybe only slightly worse than hot water at disinfecting laundry.

3) Cleaning Power - Hot water does work better at getting out and breaking up dirt and grime. Hot water doesn't kill anything in your laundry, but it does help release dirt and gunk in your clothing, that gunk that might be encapsulating some of that bacteria you want to get rid of. Why? Because it's hot. Heat is something in school you added to things in your chemistry labs to create reactions, right? It does the same in laundry; it increases the speed and reactions of the molecules of the detergent and dirty laundry dirt and increases the solubility of the dirt you are trying to get rid of. In other words it makes your detergent work better as described here.

Yeah for hot water, the superhero sidekick to laundry detergent.

4) The Washing Machine - What about your workhorse, the washing machine? You know, I would think the items which job is to get things clean should be clean, but they aren't - Every time I have to clean that grimy soap film off my bathtub I am reminded that self cleaning tubs would be nice. The washing machine needs cleaned too. I was told this by the Maytag washing machine repair man that visited me many years ago to fix the broken belt on my washing machine. He made a comment that the move to washing all in cold is giving him more business because the gunk buildup in the inner parts of the machine create chaos. He advised not to go completely cold if I wanted to avoid seeing him again. For the same reason that hot water works at getting gunk off your clothes, it gets the gunk off the inner recesses of your washing machine where your dirty water flows out. Plus if you are using too much detergent (basically if you are using the amount of detergent your brand is telling you to - think, the more they use, the faster they have to buy more) your build up can really cause problems. He only suggested I stick with doing a hot water load with my whites as a reminder, but this site gives some more detailed instructions on cleaning your washer periodically to keep it running well. Which reminds me, there is leafy mold-like crud hanging around the washing machine's top gasket downstairs; need to clean that sucker.

Yeah for hot water keeping the expensive repair man away!

2 votes for cold, 2 for hot-- we have a tie!

So for me, I run hot water every now and then when I know I have a heavily soiled load of laundry (diapers, work clothes) to boost my detergent's cleaning power and to keep my machine running well for longer. Yet the rest of the time I run cold water to avoid the high cost of heating water, and I hang my clothing out to dry because it's a free disinfectant; I would be silly not to take advantage of the sun and its disinfecting qualities when it saves me the cost of the dryer, which costs tons more than this whole hot water issue.

Wednesday, March 11, 2009

Toddler Watercolor Paint

My toddler got a hold of my basting brushes and wanted to paint as I was cooking. So quickly, I grabbed two small bowls, put a drop of food coloring in each one and filled with water. It obviously hardly colors anything (and hopefully won't stain anything), but it gave her "paint colors" since I know she wouldn't have been fooled by water. I sat her down with a piece of newspaper and she colored away for quite a bit of time getting the floor sopping wet which I later just cleaned up with rest of the newspaper and a rag, no staining, yeah! Good thing I used food coloring since I caught her a little later sucking the water out of the paint brush.


Tuesday, March 10, 2009

Make Your Own Instant Oatmeal Packets

My hubby takes instant oatmeal to work for a snack when he gets hungry and I am trying to cut down on cold cereal cost, so I ventured into making them myself, they are super easy to make too!

Instant Oatmeal Base

3 cups instant oats
salt
add-ins

Blend or food process 1 cup of oats until powdery. Take snack sized ziplocs or small containers (makes 8 packets) and put in each 1/4 cup instant oats, 2 T powdered instant oats and one shake of salt from the salt shaker. Put in add-ins for each packet for the flavor you desire. To make, put mix and 3/4 cup milk in bowl and stir. Heat for about 2 min. in microwave. (My hubby doesn't think these taste well with plain water, so at work he puts in 2 spoons of creamer.)

Here are the flavors that we have tried and liked. I'll add more when I make them; I'm thinking brown sugar and syrup would be good, but would have to add the syrup after the fact.

Spice - 1 T brown sugar, 1/4 tsp cinnamon, dash of nutmeg
(For a Maple and brown sugar, use the spice add ins and then stir in a glug of Maple syrup after it's been microwaved.)
Banana Nut - 1 T brown sugar, 1 T chopped nuts, 1 T chopped dehydrated bananas
Fruit and Cream - 1 T sugar, 1 T chopped dehydrated fruit, 1 T powdered cream
Apple Cinnamon - 1 T brown sugar, 2 T chopped dehydrated apples, 1/4 tsp cinnamon
Pumpkin Spice - 1 T brown sugar, 1/4 tsp pumpkin pie spice
Cinnamon Bun - 1T powdered sugar, 1/4 tsp cinnamon and either 2T creamer or microwave with half and half or whipping cream.

Monday, March 9, 2009

Junk Mail Envelope Shopping List System

Save the return envelopes in junk mail.

Write your list for the grocery store on the back. (I have a permanent pantry list written in the order of the aisles of the store I most often frequent that I use as a guide, so that I write them down in about the order I need to get them to help me get out of there as quickly as possible without numerous trips back and forth and forgotten items.)

Star the items you have coupons for or for price matching to remind you at the checkout line that you need to give these special attention. If price matching, next to the shopping list item, I write the abbreviated store flyer name, page number and advertised price. When looking at the shelf price, I can easily see if it is worth doing price match just from my list and the store name and page number helps me find it quickly at the checkout. I always circle the item in the flyer with a Sharpie so I can see it really quickly. I always put these items in one section of the cart and unload them first and get it over with.


Store the coupons you plan to use in envelope.

Friday, March 6, 2009

Reader Suggestion Friday - Reuses for Wool Sweaters

I have to say that t-shirts and wool sweaters have become a "staple" in my craft piles for making do. Every time I see one these for cheap or free, I pick it up even though I have a pile at home. Someone who just joined my blog is enamored by wool sweaters too and collects reuses for them on her blog; she's enamored enough to sell them for those that want them but live in an area where they are hard pressed to find them (i.e. Florida). Her blog, Resweater, lists some projects that she has found others using old wool sweaters for. The below links are a few I think that are within my sewing skill level and are practical that I liked. (I'm not one for artsy/decor stuff, but there are projects highlighting that too if you are interested.)

Mix and match Child Cardigans

Wool Berets

Ice Scraper Cover - Gotta do this one

Rag Rug - Really nice, I'll have to do this one too sometime in the far far future.

I'm planning on someday making a crazy quilt with all my scraps that are too small to do anything with, but I know that will be ages from now considering how much time that will take!

Thursday, March 5, 2009

Homemade Heavy Duty Cleaner

I ran out of CLR for the bath tub and looked around for a heavy-duty homemade cleaner. This lady turned me onto it when she got a free sample of CLR and said it didn't work any better than her homemade stuff. Here's what worked well to get the month of soap scum off my tub.

In spray bottle, mix

1/4 cup vinegar
1 T borax
1 squirt dish soap
Fill with water

Now, for really caked on stuff that needed a scouring agent, I sprayed with the spray and took my parmesan shaker of baking soda and sprinkled it on.

Worked just as well as the CLR has in the past, which was the only thing that worked on our tub and surround considering the manufacturer's limiting the use of anything really strong and the CLR actually changed the metal coloration of the drain which would then slowly return to its original color, that, I have to admit, kind of weirded me out. But now, I have a homemade cleaner and it only costs me pennies.

Wednesday, March 4, 2009

Kitty Litter Alternatives

So the two cats that I brought home, one from the pound and one from freecycle, whose purposes were to stay outside and catch the huge field mice in my pastures have convinced me that they are house kitties. The pound kitten just watches mice, so she was hopeless, but the other one is a great mouser, but has decided she belongs inside if my other one does too and will go outside to catch a mouse, but then returns shortly afterwards.

So, now I deal with kitty litter, eck!

In my desire to cut down on trash and spending I started looking for kitty litter alternatives, I hope my story will help you if you want to journey down that road.

First, I was using the clumping clay litter. I would throw the "lumps" into a walmart sack and into the trash, but even before I cut down on trash I couldn't bring myself to throw away the whole contents when it came time to change the box. So, I would go outside and find some hidden area under trees where no one goes to dump it. Clay litter mud clumps are still there in areas.

So first, in an effort more for just cheapskate sake, I went to normal cheapo non-clumping kitty litter. Worse, for you have to change it more often since you can't sift out clumps therefore more wet clay clumps under trees. So then, I started looking for biodegradable alternatives online. If I am going to be dumping outside, I want it to decompose.

I found a site where some lady made her own by shredding paper and wetting it and forming it into little balls. Junk mail=free litter, I was all for it. Then I made some and two days later they were still damp little balls. I was not going to waste electricity by dehydrating them! And I could just imagine people's faces if I made a rack for drying kitty litter on in my house. So, that didn't even make it in the litter box.

So then, I read some just use shredded paper. My shredder makes long strips which the kitty that is fascinated with the potty, just found it too much fun to play with. Strips of newspaper were batted around all over the house. Neither cat used the litter box for two days. They did follow me outside and must have went there, but I wasn't going to chance any longer of finding piles behind some piece of furniture. That was abandoned.

Then I decided to get a different shredder. A micro shredder that cuts paper in tiny pieces (I have other projects I wanted to use this for, so if it didn't work as kitty litter I wouldn't be too put out.) Worse! They used it, but now they tracked it all over the house. Mom was visiting and was feeling sorry for my frugal ways and insisted she should buy me kitty litter if this is what I felt good about living with. I had to assure her that she just happened to come on test day and no, her grandchild was not walking around in tracked kitty litter all day. That experiment lasted half a day.

So then I went to the feed store and decided to buy the cheapest feed. I bought cracked corn. Too big of pieces to sift and the poops just floated around in there and the urine went straight to the bottom. I had put newspaper in to soak it up, but it wasn't working too well when those poops didn't get covered and the cats would get previous poops stuck on themselves and it come out of the box with them.

So then, I went for poultry crumbles. Not the medicated chick feed, didn't know what that medication would do to the cat, but hen crumbles. This I liked fairly well. Cheaper than clump litter and it did naturally clump. However, it does have a grain smell. If you have either passed a grain elevator or smelled animal feed grain you know it isn't exactly pleasant, but in the box in the corner, I couldn't smell it. But one of my cats either out of protest for the smell or she had had it with my experimenting refused to use it. She would poop right outside of the litter box. I tried for a month, but had had enough.

I only had one more option that I had read about that I was going to try. Potting Soil. But it's seasonal unless you have a nursery open year round and I had a feeling I would be changing it too often and I was tired of the experiments myself, so I didn't try it.

I happened to be in the farm and feed store and exasperated about cleaning up more poop, so I went to pick up regular kitty litter, when I saw that they carried some alternative litters. There were three litters made of pine shavings that said they were compostable. I bought the cheapest bag; it was still cheaper than the clay litter which made me happy. One more try!

I replaced the litter with this and now both cats use the litter box. It doesn't clump as well as the fancy clay litters but it does clump surprisingly well. It's called Feline Fresh and if you try it there is a mail in rebate for the purchase price on this page!! So it wasn't any cool creative thing on my part, but it is cheaper and I have a spot outside for the kitty stuff to decompose but not in my garden compost. I also have quit bagging up the clumps in the walmart sacks. The litter says it is flushable, but my one cat who loves the potty makes so many clumps that it takes less time to toss it out in the bad compost spot then to put a little bit at a time in the toilet and waste water flushing. I took a plastic coffee container with "aroma seal" and wrote on the lid that it is for "cat poo" and scoop it into there to carry out.


Tuesday, March 3, 2009

Dump Your Own Trash

Last month, my garbage bill got hiked again! $91.60/3 months from $73.80. This is the third straight bill where it went up in cost. So I canceled my service; I will take it myself. You do need a truck a van with removable seats or access to one to make this worthwhile.

One, I will save money, and two, it will force me to recycle which I have been too lazy to do when it was easier just to toss it.

Find your local dump if you have one. Mine's actually two towns over (You can call your county enviromental department if you don't know where yours is), find their hours and their minimum charge. My mother takes her trash in every 3-4 months to a transfer station and pays, oh, $10. My landfill's minimum charge is $50.33! I am unlikely to bring more than a ton of trash, so the minimum charge is likely what I will pay each time I go there. See how many miles it will take to get there and take into account the fuel efficiency of the vehicle you will be using. Gas will cost me about $4 to go there at the current price of gas anyway. So grand total of $54.33. I have to wait at least 8 weeks to break even and waiting longer to save more money. Plus, I don't know about you, but I often forgot to take trash out on the right day on time and then I just wasted about $8 of payment for the service.

Or of course, if you can get someone nearby of like-minded nature to join in with you who will produce as little trash in the same manner, you can cut that cost in half! I think a regular truckbed could handle 8 trash cans. Or find a friend who is keeping their trash service and ask if you can add to their pile and pay them a bit a month for the help they are giving you.

So, to make it 2 months +, I used the money that I had saved up for that hiked bill, to buy a few more garbage cans with nice locking lids. I now have 6; 4 tall ones for trash and 2 large long ones for sorting recycling. I only want to put in real stuff for the landfill, not the stuff I can get rid of or that will stink it up.

So, I found out what the recycling place will take and now keep out of the trash all of those items and sort them in bags and then place them into their own garbage can for taking to the recycling center. Wash/rinse and let dry food plastics and cans to keep them from smelling as they accumulate. I took my first set this time just to see how the recycling went, but I really didn't have enough to merit going once a month, so I will wait to take these for at least 2 months from now on.

I found where the household hazardous waste department was by calling my county Environmental Office and got the hours I can take my dead batteries, CFL lightbulbs, paint, etc. and they are accumulating in a box in the utility room.

I have a burn box for the paper products that recycling won't take -- here they won't take my food/cereal boxes. So when that gets full, I will burn it, of course, you can only do this if you have a decent sized yard and no rules against burning in your area. Otherwise you would have to throw it.

I have two compost ice cream buckets. One for the garden compost: veggies, coffee grounds, grains, fruits etc. that will be ok for gardening. The second for "bad" compost: dairy, meat, bones, grease. The garden compost is above ground to compost and turn, the bad compost has three options, when my hubby gets around to installing the garbage disposal everything but the bones will go there. But for now, they are thrown on the ground separately from my compost or if you are worried about it being messed with you can dig a small hole in the ground which you can periodically bury -- I have very little of this kind of trash. The "bad compost" will degrade, it just isn't good for the garden unless you are diligent at watching the temperature and turning it so that you are assured it composts, I'm too lazy, so I don't want to mix it to be on the safe side. If you don't have a garden, you could compost it all together if you just wanted to throw out the food. I don't want to put the bad compost material in my garbage cans because they have to be there at least 8 weeks and I don't want it to stink!

In the other rooms of the house that collect trash, I do now have two little wastebaskets, one for actual trash and the other for recycleable/burnables to sort out later when full to the appropriate places.

I cloth diaper so all that stinkiness is gone to the septic. So all that really goes in the trash now is unrecycleable plastics and metal things unworthy of going to the scrap metal place and other such things. Where I was filling a kitchen wastebasket worth of stuff about 2-3 times a week, I am now only taking actual trash out less than once a week to their new home in the garbage cans and I am sure I have room for improvement. I am on week 7 and have almost filled 2 large trash cans - I will go when I fill all four, but I am already only one week away to being cheaper than the garbage service. Going at this rate I will have to take trash in at probably 15 weeks. That's a savings of $3.43/week or 15 week savings of $51.45 and less clogging of the landfills by yours truly.

UPDATE: A friend of mine lets me bring my few bags of trash with me when I visit her, she isn't interested in giving up trash service and just enjoys my visits as "payment." SCORE! No paying for trash anymore!

Monday, March 2, 2009

Homemade Liquid Hand Soap

In case you were all excited about some homemade recipe for smell good pretty stuff like you find at bath and body works type places, I think you will be disappointed. I have never understood the desire of ladies to buy expensive soaps that leave a lingering scent on their hands for a few minutes that when sniffing it, you are reminded that you are hungry and even if you aren't hungry it makes you think of vanilla sugar cookies that in turn make you thing of the goodies you could go grab and eat. BUT if you like soap dispensers and want your hands clean for pennies, then you may be happy.

Wait to buy dispensers on clearance or better yet, when some lady gives you one of the above mentioned smelly soap dispensers, reuse it once you are done making yourself hungry washing your hands.

Fill the container with water, put in enough dishwashing liquid to turn it blue or yellow or whatever color you got. That's it. Not only does it come in handy for washing hands, but for washing just a few dishes in the sink separately and for squirting one pump into your tin can or plastic food container to rinse out to store in recycling. And the boys won't turn their noses up at using fruity girly soap.