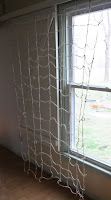
I bought some jute string. And I took 6 foot pieces and tied them to my indoor clothesline to a width of 6 feet. (I had tried to do this on the floor but it was a disaster.)
Then I took some more 6 foot pieces and tied them on horizontally. I found it best to tie at the top, bottom and middle first to keep the net from getting narrower as you get closer to the bottom.
Then I just kept halving the distances in between my horizontal pieces until I made the net.
This makes a great cat toy by the way, but my toddler loved to try and hang herself in it by wrapping her head in it, so word of warning, do not leave this unattended with small children!!
It took me awhile to come up with a knot that I could do that was sturdy, but that I could do all the way across. Basically it is a clove hitch knot. It took a while to figure out how to do it without having two end pieces, so I made a video of me doing it if you are interested. (Husband zooms in on the second try so you can see it more clearly if you wait through the first knot). If you were a boy or girl scout you will probably laugh at my ineptitude with knots, but knots are just not my thing. But I like this one because if you pull tight, it doesn't slip, but loosening it is doable in case you knotted it too high or too low and didn't catch it until later. The knot is movable.
Now I have two t-posts in the ground. I just weaved the sides onto the t-posts and then I weaved the cross bar (don't ask me what it is, I salvaged it off of a barn) through the top of the net and then used baling wire to secure the cross bar onto the t-posts, so now the net is permanently attached and ready for a vine to go climbing through it.


If you are wondering, I used salvaged wood from my balcony and a pile of bricks found on my property to make the pathways around my little squares. Under them, I took a large piece of black plastic that you can buy at home improvement stores for $15 dollars or so (we had used it to cover up half of our house when we where stripping the exterior, but Kansas wind just tore into it) and cut it to fit under the pathways, so hopefully I won't have any weeds growing through them. I hope to teach the toddler that she can only step on the paths because last year she found it a hoot to step on the plants.


1 comment:
Ok thank you SO MUCH for posting this. I have been eyeing some of that netting at the store and I just can't justify the expense. Well, until now!! Whoo hoo!!
Post a Comment