Follow Me on Pinterest
Instead of posting links to Making Do Ideas on this blog now (I'll just post my own projects here though they are few and far between now), I'm now posting them on my Pinterest Board named Making Do Stuff.
You do not have to have a Pinterest account to see it.
Showing posts with label Sewing Projects. Show all posts

Monday, August 16, 2010

Cheap Salvaged Elastic

I needed elastic for some maternity pants and figured, why not salvaged?

Buy large-sized sweat or elastic waist pants or skirts with wide elastic or whatever size you need. Choose pants or items that have the least sewing through the elastic that you can find. Not that it hurts the elastic, just takes more time to get it out.

Take seam ripper and dislodge your elastic. Considering it cost me $2.59 to buy elastic for the last pair of pants I made, getting pants for $1 or less would be totally worth the about 20 minutes it took me to take the elastic out. And if you can cram as many items in a sack as I can on dollar day, my elastic only cost me 2.5 cents and time.


Don't throw away old sweats until you take out and save the elastic! I know I won't be doing that anymore.

Monday, May 31, 2010

Sheet and Pillowcase into Mommy/Daughter Work Dresses

Ok, these things aren't going to win me any fashion awards, but I wanted a comfortable long dress that I could make in less than an hour that I can wear around the house when it's hot and I'm not intending to go anywhere. And because most of my clothing is too tight at the moment.

I have one of those dresses I picked up from the thrift store, laid it out on a twin flat sheet I picked up somewhere and hacked around it and sewed for an hour (mainly b/c of my dumb machine's bobbin kept tangling)

And then, I couldn't resist making a "matching" dress out of the pillowcase for my kiddo. Basically on that one, I cut off the top, cut down about a quarter way for arm holes, hemmed the arm holes, made a casing on the two tops and strung ribbon through the casings and tied at the shoulder. The material is rather thick, think it will look better on her tiny body with a thinner pillowcase.

So, we both look like we are wearing a trash sack as my hubby so gently put it, but we match and we'll be in the garden with them anyway. I call it good for about an hour and a half. Boy do I hate sewing.

I tried to make it less sack-like with some more of that ribbon, but it just showed off my pregnant belly. Not that much better considering I'm just showing but I look 6 months pregnant. I guess that's the horizontal striping for you.

But hey, some of you sewing people out there could make a better stab at it using a sheet and pillowcase.

Monday, May 17, 2010

Thrift Store Clothes into Prairie Dress Up Clothes

So, I've been looking for thrift store clothes that I can make into fake late 19th century clothing. Why? Because my bathroom is decorated in my families old sepia photos from that era and my color scheme fits those old photos (browns), but the middle photo frame across the wall is blank. That's for us. If I ever get us dressed appropriately. The blank (ghost filled) frame has been there for almost 3 years.

Thankfully, I had gathered my materials, but not the time. But the local homeschool group wants my hubby to come for their pioneer day to demonstrate blacksmithing and they are dressing up. Yeah! A fire under my butt.

So, Hubby was easy. Add some buttons to his jeans for suspenders and move the button on his old rendezvous shirt from high school.

Me: Unfortunately it was yellow (hate yellow) but this sundress was easy. Took off the straps and pulled the elastic gathered bodice down to my stomach to make it floor length and then I found a shirt that looked old fashioned (a little too much plunge in the front, but I'm just faking this)


The kiddo was the hardest, I took an old ugly grandma's dress that had old fashiony front and a man's pink oxford. And happily, an already-made sun bonnet (that I'm sure won't be worn very long).

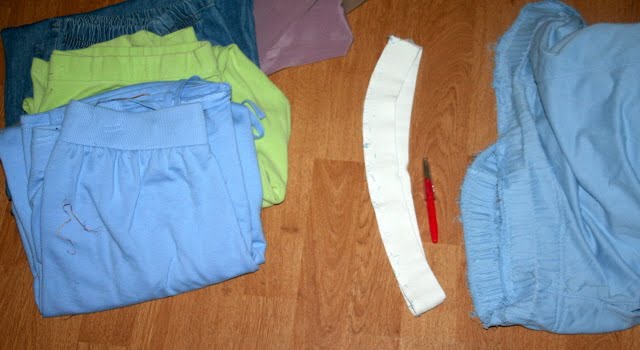
No tutorial because it was all eyeballing and using my 
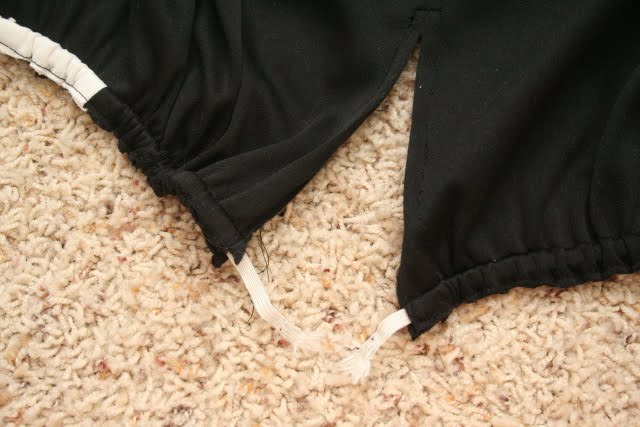
toddler's fake double. Basically I cut the collar off, the torso down and shortened the skirt, flipped over the elastic casing (like I did in the dress into skirt refashion from last week) and reattached it to the bodice. I didn't put sleeves because a) I suck at sleeves and b) it's summer and my child is known for taking off clothes and running in her underwear, so I figured I'd try to combat the attempt with making it quite summery.

Now, no more ghosts reside in my bathroom. :)

Thursday, May 13, 2010

Free Dress=Free Skirt

I found this dress on the free rack, didn't try it on, but it looked like it would be a good swinging skirt.

So, first I ripped out the zipper, then I cut it off right above the elastic casing. It was too big to stay up on its own, so I unpicked the seam holding in the elastic and pulled it out until it fit me. Then I sewed the elastic in place.

Then, I folded the casing over, pulled the elastic tight to make the fabric flush as I sewed it with the machine along the cut off edge.

Then I sewed up the zipper slit and now I have a new skirt.

Friday, March 5, 2010

Make Adjustable Jeans

Does your kiddo have problems keeping his/her pants up? Julie K has a tutorial on converting your child's pants to adjustable pants.


Friday, February 12, 2010

Making Patterns from Store Bought Clothing

There have been times where I wished I had bought more than one of a particular clothing item. And I wear it even past the point of stains that won't go away because they are so flattering. I would have loved to been able to make another one, and now with instructions from Donna on Homemaking Made Easy I might be able to do that with the next shirt or skirt that so inspires me.

Make Patterns from Store Bought Clothes Tutorial


Tuesday, February 9, 2010

Sweater turned Draped Cardigan

Ok, I bought a sweater ($1) to do the refashion posted on these two blogs, but it didn't turn out so well, it was nice, but not big enough. I would suggest at least two sizes bigger than you, not just one. So, who knows when I'll find another since it took me awhile to find the last one. So, in case you got a sweater with box cut (non surged or a non-knit sweater) sleeves, I thought I'd post the tutorials anyway.

Flowery Skirt Tutorial and Absinthe and Orange Tutorial (I found using both of these for different aspects of the construction useful) And be really careful when picking out the seams of a knit sweater (whoops!)

Monday, January 4, 2010

Paper Tape Dummy

I've given instruction links to a duct tape dummy here. And made a duct tape dummy for my toddler here.

This gal, ancien-nouveau, shows you how she made a paper tape dummy here.

Friday, December 4, 2009

Girls Hoodie to Toddler Hoodie Dress

Using my dummy from yesterday for sizing, I took this size 10 girls Old Navy sweatshirt that had been donated to the thrift store because someone didn't know how to mend the split pocket seam . . .


And made it into a toddler dress. Merely sewed up the sides, sewed new thinner sleeves and cut the sleeves shorter. Didn't do anything with the hood. Didn't bother moving the shoulder seams, so they are a bit down her arms, but I think it looks just fine. And she loves her "jacket dress."

Thursday, December 3, 2009

Toddler Dress Form Dummy

I am really not a pattern follower, and my toddler won't sit still for me to drape and pin things that I find at the thrift store to refit for her.

So, I made a dummy toddler.

I first cut down an adult turtle neck to fit her pretty tight, it was ugly, had holes in the seams, etc. But she declared it a pretty princess dress. If that wowed her, anything I do from here on out will be splendid!


Then she was thoroughly excited to spin around while I duct taped her arm pits on down, but then got a bit upset doing around the neck because it kept catching her hair. Note to any other mothers attempting this, gel the kids hair/plaster it to their head before trying. Needless to say, she's not having so much fun at the end.


I made a waist line on her by having her bend at the side for reference for later and to tape it back together. Then I cut it off of her down the back. Then I taped it back up.

Then I took the leftover turtle neck material and all the other misc. things I have scrapped and stuffed it halfway.


Then I stuck it on a dowel rod planted in a piece of scrap wood. (This had been doubling for the toilet paper dispenser under the curtained sink in the guest bath, but I kiped it, it was meant to be a mannequin base.) Then finished stuffing up around it. Then I pulled up the excess turtleneck material and pinned it up to keep all the stuffing in. Viola, My 3 year old on a stick complete with pooched out belly.

Friday, November 13, 2009

Whole Bunches of recycling T-shirt Tutorials

If you've read my blog very long, you know that one of my favorite things to reuse is t-shirts. Anything from adjustable diapers to cushioned rag curlers, to grocery sacks.

But checking on some links to this blog, I found this great post that gives tons of links to tutorials for how to recycle or upcycle t-shirts. (This is only the first page of the post, he's got 5 pages to scroll through, scroll to the bottom to go to the next page.)

These two transforming t-shirt projects I think I may do in the future, I liked them the best:

Thursday, November 12, 2009

Costume Extension

This may not be helpful to all, but it's a way I made do a few weeks ago. My little girl's grandma sent her some Disney costumes. My little one has never watched Snow White, but she knows who she is and was excited for the Snow White costume, but unlike her other costumes, it is two pieces.

I won't post a picture, but she insisted that the skirt's elastic waist sat below her bum. So she was running around in it with her little pink britches poking out the middle. So, grandma wondered if it was because the skirt wasn't floor length that she was attempting a fashion no-no.

So, during her nap, I stole her costume and rifled through my old clothes stash and decided upon this t-shirt material shirt.


Then I laid the skirt on top and eyeballed how long it needed to be on my girl to make it floor length, if she were to leave the elastic on her waist. Then cut straight across.


Then I lined up the side seams and then pinned in haphazard pleats. Then sewed across.


That seems to have been the problem. Now she has a "real princess" length skirt that she willingly wears above her rear.

Wednesday, October 21, 2009

Wowser Wednesday - Fitted Sheet Bubble Dress

Kate emailed me to see if I had ever heard of how to change a fitted sheet into clothing while taking advantage of the elastic already in it. I hadn't but I found this lady, Ivy Frozen, on Threadbanger had. Here is her tutorial video as well.

Monday, October 19, 2009

Hassock Cover

With my new couch and pillows, my unmatched hassock stuck out like a sore thumb. So I had to cover it. I took more of the bedsheet I used to cover one of the pillows. I took the measurement of the top of the hassock across the top and to the middle of the sides. So my top was 20" x 23" and from the sides down to under the hassock cushion was 3", so I added a 1/2" seam allowance and cut out a 20 1/2" x 23 1/2" top piece and then (2) 3 1/2" x 20 1/2" pieces and (2) 3 1/2" x 23 1/2" pieces.


Then I sewed the small edges onto the big piece making a box. I then stuck the fabric "box" inside out on the hassock cushion. At the corners, I pinned the material so that it was tight fitting.

Then I took tit off and sewed using the pins as my guide. I tried it on the hassock to make sure it fit, then cut off the extra fabric. And put it on to complete my living room.

Thursday, October 15, 2009

Rescue Couch - Cover Pillows

The people who sold me the couch took off $18 from the original price and threw in two zebra pillows to entice me to take it. (They had another shipment coming in and needed the room.) Obviously, zebra pillows don't go with a brown and black checked couch, but no problem, I could make them match.

I took a brown turtleneck from my scrap clothes pile and a lone bedsheet.

For the first pillow, I took the turtleneck, turned it inside out and sewed up the bottom closed. Turn it back right side out and I squished the pillow in through the neck hole.

Then I tucked in the neck to lay flat and then tied the arms across the chest.


For the second one, I made a coverslip for the pillow from the bedsheet. The pillow was 19"x19" So I cut a piece of fabric 20" tall and 30" wide. (To get 30" I took the main size across, 20", and added two halves, 10" to come up with 30"). I should have only made it 19 1/2" tall since it came out a little loose.


Then you hem the short 20" edges and then fold them in, the edges overlapping each other until the width is 20" with the right side of the fabric on the inside facing each other.

Then you pin across the top and bottom and sew straight across these seams.

Turn that rightside out and slip it over the pillow, the overlapping fabric keeps the ugly pillow from showing through the seam and lets you take it off for washing. So here's the end result.

Monday, June 8, 2009

Formal Dresses for Dress Up Clothes

I have always wondered at the thought that went through the thrift store employee's mind that thought pricing fluffy out-of-date 80s prom dresses/wedding gowns for $20+ was a good idea, but I have been on the look out for the the frilly 80s dresses believe it or not. My mother's boss when I was a teenager, cut down a few prom dresses to fit her kid, which I thought was neat, but this lady is an actual knows-what-she's-doing sewer.

But, since I have been keeping my eyes peeled this last year for formals to do this with, not knowing how well I can refashion them, I made a deal with myself that I would not consider any above $5. Amazingly, I spent no more than a dollar on any of the 8 that I picked up and one just happened to fit me which I like! Since it was in the dollar bag sale and it evened out that I got it for 3 cents, it hangs in my closet for sheer silliness. Not that it has the chance to see the light of day, but one can hope.

Anyway, so I had 7 dresses that either didn't fit me if they were nice ones or awful 80s poofy things and a lucky find of a flower girl dress. I have been debating on how to do this, because I don't want to make them all so small for my (almost) 3 year old and then have to go through the whole process again for her when she gets bigger, plus, I don't think I am skilled enough to really cut them down to size. So, how to sew them so the 2 year old can play in them, but still be salvagable or resewable so that they grow with her?


Basically, I did 3 things to the dresses. I took all the bodice seams and folded them up and sewed them in about 2 inches. Each dress has two seams in front and two seams in back. That makes most of them fit the size of a 2-5 year old (they are a bit big on the 2 year old). I am doing all my sewing in a color that doesn't match the item so that in a few years when I have to let these things out, I can easily identify the seams to rip.

Then I took the bottom of the dress if it was a long one and pulled it up inside the dress to the waistband of the dress and just tacked it there with about 2 inches of sewing. This makes it able to be a dress where my kiddos feet can poke out, capable of walking around in it, gives her a train (what girl doesn't want a train?) and yet I don't have to cut it and I can let it down as she gets older.

And then I had to bring in the sleeves somehow. Each dress was different. The one with the spaghetti straps, I just tucked in the straps and sewed the shoulder pieces together, a few I tacked it down onto the neckline, but most of them I just folded the shoulder down, creating a loop and tacked it together so that the arm hole is smaller, but the sleeve isn't cut. The seam will just have to lay back against her shoulder. I hope that is as clear as mud. The arrow furthest right shows the sleeve gather, the other two show the 2 inch seams around the bodice.

Hmmm, wonder if anyone but me understands that picture!

Here's a room full of dress up clothing, my child's favorite activity, now complete with two handfuls of formal dress up clothes.

And here's the happy model in a several of them.


Friday, June 5, 2009

The Sad Loss of Sewing Know-How

As I have started into living simply and frugally, I have found that skills that all of our grandmothers most likely possessed have almost vanished from the skill set that we have been given as kiddos now venturing out into life. My mother knew how to sew, and I was given the simple knowledge of how to do that. Nothing in depth, but it was enough for me to venture out into the world of sewing which I find almost to be a necessity for frugal minded folks.

Don't be intimidated. Pick up a machine (I got an older model at a thrift store for $20 and a electronic one for $40 at an auction) and play! I had to buy a manual for the Elna machine I bought, since it didn't come with the item, and I couldn't figure out how to thread it. I don't remember where I bought it from; I think it might have been this one, but you can get manuals for second hand machines though you may have to pay. This site may help you find a manual as well.

I really have to say that the basics I was given at home and the making of play clothes and other items that I wasn't too worried about looking sloppy, has been what made me confident enough to refashion a sentimental item of clothing into something I would wear in public. I don't think I would have attempted it a year ago even. And I know I still have a long way to go in learning how to sew well.

I think it would behoove anyone to learn how to sew. Hopefully you have a mother or grandmother that could teach you; I bet they would be happy to do so! If not, you can always learn the basics and play until you build up your confidence. Look up community college classes if that is available to you or below are some free instruction books on pdf. I am actually wanting to follow the old hand sewing books from 1901 and 1915 when I get the time! I have also easily picked up old sewing books from like the 1960s (maybe there was a big rage for learning to sew back then?) that have lots of in depth instructions on sewing. Like how to do every kind of pleat imaginable to vinyl bedspreads for your child's room. Ok, so most of the designs are way outdated (who would ever want a vinyl bedspread!) and make you wonder why anyone thought that was cool, but all the information on how to sew arm holes and pleats and such is worth a quarter at a garage sale!

Machine:
Free Sewing Book for Beginners

Hand:
Hand Sewing Lessons

When Mother Lets Us Sew

And remember, if you know how to sew pass it on to the next generation!

Thursday, June 4, 2009

Altered Dress Qi Pao

I had two traditional Chinese dresses (Qi Paos) made for me while I was in Dalian 10 years ago. Either the tailor didn't understand my Chinese or decided what I asked for was odd and shouldn't be done my way, but my white silk dress turned out looking like a wedding dress. A wedding dress that made me look like a cow.


I decided that ten years in the closet was silly no matter the sentimentality, so I decided I was going to alter it into a shirt so it might see the light of day. I chose a day when hubby wasn't home since I knew he wouldn't be too happy because he liked the thing. I put it on over the slacks I thought I would wear with it and rolled it up to the length I liked and pinned each side to tell me where the length I liked was.


I then placed it on my dress dummy, the first time I used my present from my mom. (If you want to make your own dress dummy, if your mom doesn't surprise you with your own, see this post.) I used a measuring tape to make sure the pins I stuck in where the same length from the arm pits and then used the tape again around it like a belt which I used as a guide to put pins all the way around the dress where I was to cut it off. My two year old was begging to get the "pretty princess dress" off the dummy so she could wear it, unfortunately with the next step that I am about describe she burst into tears and was no longer happy with Momma's sewing project.

So, I cut off the fabric with scissors about an inch below the pin line. I hesitated for a bit knowing how not-so-great a sewer I am, but decided to be brave. The kiddo was not thrilled with my bravery.


Then while still on the dummy, I flipped the hem under and pinned it to visually see that it was nice and even.

Then I ironed the flipped edge flat. Did the first sewn hem around it, this time going slowly and carefully in the machine instead of the maniacally fast sewing I generally do. Then I cut off all the excess fabric and rolled the hem up and rehemmed again so that the fabric didn't unravel. I have to say I was pretty proud of my first real hemming job, it looks good on the outside AND the inside.


And there you have it:


Still maybe not the most flattering, but I think I will actually wear it out now!