Follow Me on Pinterest
Instead of posting links to Making Do Ideas on this blog now (I'll just post my own projects here though they are few and far between now), I'm now posting them on my Pinterest Board named Making Do Stuff.
You do not have to have a Pinterest account to see it.

Friday, November 28, 2008

Lightbulb Ornaments

A good use for the lightbulb you are replacing with the CF lightbulbs - make ornaments!

Here are several ways - I have none on hand, bummer!

To make a very cool Victorian-like ornament, the base is a lightbulb, a dishsoap cap and a bottle cap. Very cool!

Glittered Lightbulb ornaments

Snowman Lightbulb ornament or this snowman

Angel Lightbulb ornament or This angel ornament

Penguin Lightbulb Ornament

Santa Lightbulb Ornament

Grinch Lightbulb Ornament

I am sure the possibilities are endless.

Thursday, November 27, 2008

Christmas Ornament - Wool Sweater Candy Cane

I have an abundance of wool sweater scraps from my diaper cover projects. These pieces of wool are already felted (shrunk).

First I took some red and white wool sweater scraps.

Then I cut them into little one inch squares.

Then I took a hole punch and punched them in the middle of each square. My hole punch didn't cut cleanly through, so I just left the "hanging chad" on there. My hole punch did often get stuck, but I just pried it apart each time.


Then I took a pipe cleaner (unfortunately I couldn't find a red or white one) and scrunched it up on one end to make a "knot," and started to thread them on alternating colors.


Then when I got it mostly filled, I made another "knot" at the top end and bent over the pipe cleaner. Then I cut a length of wool sweater and tied it together and hid the knot in the fold of the candy cane for a hanger. And there you have a wool sweater candy cane ornament.

Wednesday, November 26, 2008

Christmas Ornament - Wool Sweater Wreath

I have an abundance of wool sweater scraps from my diaper cover projects. These pieces of wool are already felted (shrunk).

This particular ornament was inspired by Family Fun magazine it's a great magazine bythe way. I took some green wool scraps.

Then I cut then into a bunch of one inch squares.

Then I alternately strung each color green onto some thread.

Then when I got sufficient green on my thread, I mushed them together and formed them into a circle and tied the thread off.

Then I took a scrap piece of red wool sweater and cut a string and tied it around the wreath, hiding it's knot within the greenery and I cut a "bow" and hot glued it on.

Here is the wool sweater wreath ornament.

Tuesday, November 25, 2008

Emergency Holiday Meat and Cheese Tray

Your spouse calls you at home at 9am and says, "Whoops, I signed up for a meat and cheese tray for the work holiday lunch and I forgot to get one, can you bring me one at 11AM?"

So at Walmart at 10AM the deli lady says, "It can't be ready until 2PM."

So, I dash off to throw together an emergency meat and cheese tray which could be assembled in the back of the van!

Swiftly checking and relying on the grocer's accuracy of price per pound. I bought swiss, provolone, white american and pepperjack cheese slices and Monterrey Jack/Colby Cheese cubes.

Then I bought roast beef, salami, pepperoni, chicken and ham slices and a summer sausage - 2 of which were on sale, yeah!

The summer sausage needed to be cut! So off to buy a knife. I have to decide between el cheapo or one I think I could use again. So I think, which knife do I always wish wasn't dirty or have to clean off to use again. The chef knife. So I choose a decent chef knife, but I was not going to buy a cutting board that I absolutely didn't need. So I figured I would use the hard plastic container one of the cheeses came in as my cutting board.

Then for the tray. I look in the Christmas party aisle and find the cheapest tray. It was some flimsy red or green ugly plastic thing for $4. So I run over to the other kitchen aisles. I find a sheet cake tupperware-like storage container with lid with handles for $5. That I could use again!

So, I rush out with this stuff, pull into the work parking lot 15 minutes before lunch time. Grab my germ x to wash up and assemble it by pulling them all out of the packages and trying to make it look nice. I pull the last cheese out as hubby is coming to get it.

Then I was curious of what I could have gotten and what I did actually purchase in the heat of the moment. I called to ask what their largest meat tray contained and cost. It was three choices of meat and three choices of cheese for about 25 people according to the sign, and would cost $36 bucks.

I spent $50. And had 5 cheeses and 6 meats, a $12 chef knife that I could use and a $5 storage container that will come in handy. So $33 dollars for food (which some returned to me for lunches and fed more than 25 people) and 2 semi-needed kitchen items and no big ugly flimsy plastic black tray in the landfill - as inconvenient as that was, I think I didn't do too badly!

I have learned one thing - I will not buy a prepared meat and cheese tray if the spouse ever volunteers that again - even choosing the convenient already sliced stuff, it cost less for the food to do it myself. And not to buy pepperoni - no one touched it! :)

Monday, November 24, 2008

Christmas Ornament - Ball of Greeting Cards

I remember doing this as a kid. I always save the fronts of my cards to use for scrapbooking or other projects. My mother saved previous year's Christmas cards for these ornaments.

First gather 8 cards with a similar theme or color scheme. These all have a hunting and fishing theme. Grab a kitchen container lid. The size of the lid will determine whether your ball is large or small.

Use the lid as a guide to draw a circle around the object in the card you want.

Now, you will cut out each of these circles and you will fold them up on three sides. A flat triangle will be in the middle. To do this, I folded up two sides to meet at the top of the picture. Then I creased them individually, then I folded up the bottom to meet the points of the two sides I already creased. (There is one I outlined with sharpie so you can see how it is folded.) I am sure you could make a pattern for this to make it neater and will fit exactly, but I was lazy.

Then you will glue each one to the other. Four will make the top and four will make the bottom. Don't forget to glue in a loop of ribbon on the top one for which to hang it.

Then glue the top to the bottom. I then took clothespins to hold all the edges together until the glue dried.

And here is the ornament.

Sunday, November 23, 2008

Christmas Ornament - Pair of Mittens

I have made myself a challenge to make ornaments this month using craft stuff that I already have at home. Join me as I sift through craft box scraps and household items and create ornaments easy enough I hope for little ones to create as well.

My first ornament was made from some thin foam, ribbon and star sequin.

I cut the foam into two pieces and cut it into a mitten shape.

I took some ribbon and glued on a "cuff" and then took two more pieces of ribbon to tie together and then glue at different lengths onto the mittens.

Then I glued on random sequin. There you have it.

Saturday, November 22, 2008

Library Entertainment

Of course, using your library to read books and check out movies is a free source of entertainment, but have you checked out your library for all the activities they plan?

Here are a few of the things that my library offers just for the month of November. Perhaps your library offers similar things?

Wii contests
Free Movie showing of Winnie the Pooh and Tigger Too, All Dogs go to Heaven, & Water
Horse
Toddler story time
Pajama story time with stories, hot chocolate and activities
Bingo Night
Book Discussions
Genealogy Classes
Chess and Checker Club
Cartoon Anime Drawing Class
Basic Computer Classes
Knitting Club
Writing Your Life History Classes
ABC storytime
Children's Craft Time
Music, Art and Drama Show and Tell
Writers Club
Earn free Library dollars to buy gifts for family members by doing a literary
item for each day of the month
Teen Discussion Time
Scrapbooking Class
Teen after school social hour

Friday, November 21, 2008

Phone Book Glue Catcher for Scrapbooking and other Crafts

I'm making a physical scrapbook for someone this Christmas. I hate the fact that when you use a glue stick and you want to get the very edges of the object you are gluing down glued, your table or papers all start getting sticky.

So to keep that from happening, take an old phone book and use that as your gluing surface. When it gets too sticky, tear out the page and throw it away!

Thursday, November 20, 2008

Use Baking to Warm the House

With all the baking about to be done, don't forget to lower the heat in the house a bit or bake during the colder part of the day (mornings), and after you're done baking and have turned off the oven, leave the oven door ajar to let the left over heat warm up the house. No sense keeping it inside just to keep the oven warm!

Obviously do not do this if there are little ones running around.

Wednesday, November 19, 2008

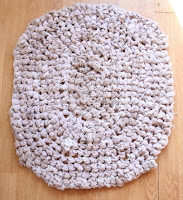
Rug Made from Old Used White Socks

I have a pile of socks with holes in them that are beyond darning. I took all my white socks (for dying purposes) and cut the non-elastic part into loops.

After I had a pile of loops, I stretched each loop.

Then I made a chain with them. I rolled up the chain into a gigantic ball.


Then I used a rug crochet hook to crochet the "yarn" into a rug. I made a basic oval shape (three single crochet in each end of a loop and two in between on each side), then just kept single crocheting in the back loops of that oval adding an extra single crochet in a loop when needed to keep the oval flat. When I got to the finished size, I just slip stitched for a few loops to make the end less noticeable. (I am sure if you need a pattern if you found an oval rug pattern for rags it would work. It isn't the funnest "yarn" to work with because of the knots and the cut socks shed quite a bit, but it isn't as horrible as working with that fake fur yarn stuff you can get now.)


Then I soaked it for an hour in 4 parts cold water, 1 part vinegar to help it take the dye.

Then I dyed it in my black walnut dye overnight. Use rubber gloves unless you want to dye your hands too.


Then I rinsed it until the water ran pretty clean. Took a lot of the dye out, so it was lighter than I thought it was going to be, but still a nice tan color. Maybe if I had let it dry into the fabric instead of rinsing it right away it might have been darker (I will try this the next time!)

I threw it in the washing machine with a bunch of rags to counterbalance the rug during the spin cycle. I did have to cut off a few threads and it took awhile to dry on the line, but nice and cushy!

It matched the bathroom pretty well, color is relative with my photographs so here are a few to kinda show you the color.


Tuesday, November 18, 2008

Brown Dye from Black Walnuts

I made dye for my rug made from old socks. My mother has a black walnut tree, so when I visited I collected them all up. I remember as a kid driving over them to hull them and getting brown stain on everything!

I put them all in a pillowcase that I didn't care for. I placed it in a trash can and filled it with hot water. I let it sit overnight.

I am storing my brown dye in ice cream buckets. (I got 4 buckets full of a deep drown dye). Since I don't currently have room in my freezer to keep them, they are going outside in the shed where they will stay cold, thankfully it is now cold outside.

Monday, November 17, 2008

Flat Fold Cloth Diaper made from T-shirts

So, I had gotten lazy and attempted using my first "flat fold" diaper by using a t-shirt. The neck hole and sleeves of the t-shirt plus it's rectangle shape made it a bit bulky. It would be a good emergency use item, but not sure I would be happy with it long term. So, liking the fact of not needing liners with the origami fold, I wanted to make a flat fold diaper.

First I took two t-shirts of roughly the same size.

I cut off the hem and cut up the sides where I wouldn't be cutting off into the sleeve.

Then I folded up the corner to make a square to give me a guide to cut it. (I am making these squares roughly 20" each for a toddler diaper.

Then I sewed them each to each other. Quite simple and I didn't bother hemming or tacking down the seam for they will be folded up in the diaper anyway.

I folded the seams to the inside in the origami fold.

And here is my kiddo in it. Lots less bulky and the front strip can extend further up the front. So this did fix the problem when I just folded it using an uncut t-shirt.

Sunday, November 16, 2008

Origami Fold a T-shirt into a Diaper - No Sew!

Call me completely crazy cheap or really adverse to sewing, but I was thinking up ways not to sew more cloth diapers since a few more of my store bought ones have made it into the rag box. I already had the emergency No Sew Hand Towel Diaper, but really, how many of us stop using hand towels until they crumble? I don't have a pile of old hand towels. When I am through with them, they are truly rags.

So, back to my old stained t-shirt pile. (One freebie from hubby's work just got added to the pile because he won't wear tshirts without pockets.) Why couldn't I use a t-shirt like a flat fold diaper? No sewing required, use up the old t-shirts!

So in the middle of the night while hubby was sleeping, I am out in the sewing room trying to figure out the best way to fold a t-shirt into a diaper with no sewing modifications. I am sure if he were awake he would have thought I had gone insane.

The best way to do it was the origami fold. You do have to learn the origami fold, but it isn't too tough, just have to get the triangle part of the fold down which is a little off in the tshirt since it isn't a perfect square like a flat fold diaper is. Watch it done, and with a little practice, it's super easy. (On this page, scroll down until you see "A longer video of the 5 year old folding and putting it on a baby doll" to watch.)

This is how you can fold a t-shirt into a diaper. The smaller the shirt the smaller the diaper, etc.
First fold in the sleeves to create a rectangle.

Then fold up the bottom to meet the top.

Then fold over the side to meet the side.

Now this is the tricky part with the t-shirt since it isn't a perfect square. Take a hold of the t-shirt at the blue "x." Hold onto the next layer at the pink "x" with the other hand. Now pull the blue "x" corner out horizontally until it looks like the second picture. It will not be a perfect triangle since we started with a t-shirt rectangle but you can make it pretty close.
Then flip the whole thing over.

Then start folding the peice that is still a rectangle over until you put it in the middle.

Now it is ready for the baby to be put on. If you use my Velcro Diaper Fastener, put it underneath the top edge of the t-shirt diaper before setting child on the diaper. Now fold up the edge between the legs.

Then bring in the corners to the middle. Fasten with Velcro fastener or with the amount of cloth there is I don't think I would be scared at all to take one huge diaper pin and fasten it. (A snappi probably won't work well because the cloth isn't a loose enough weave.)

And now you have put a t-shirt on your kiddo as a diaper! There is no extra diaper liners because there is plenty of material there - Bonus for my new diaper discovery! This is my 27 month old in an XL adult t-shirt.


Update: So, the kiddo has been a guinea pig for a few days and they work fine; they are a bit bulky in the back and the front section could be longer for an easier fit. I did try using the pin, it wasn't the greatest, the velcro fastener was much better. I did fold them all up ahead of time and stack them next to the changing table.

I really liked it for the fact that the padding was really thick, so I didn't have to put in liners and that there was less laundry to hang since it is all one piece and it dries quickly because it's just a t-shirt, no layers to dry! So, I ventured off to make my own flat folds from these t-shirts.....